This article outlines the steps required to publish your new GoSite website on your custom domain. Part 1 goes over the basic steps of pushing your site live. Part 2 will walk you through Part 1 steps 2-6 for specific domain providers (Google Domains, GoDaddy and Wix). Let's get started!
Table of Contents
1. Find your GoSite IP address using the steps below:
-
Log in to your GoSite Dashboard.
-
Click “Sites” on the left-hand side of the dashboard.
-
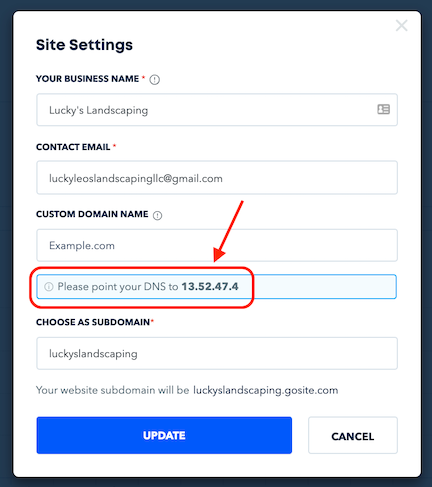
Scroll down to find a photo preview of your site (it will have the buttons "PREVIEW" and "DELETE" below it). Hove your mouse over the photo and select "Settings".

-
Your GoSite IP Address is the bold number right next to the words "Please point your DNS to".
2. Log in to your domain provider (i.e. the company you purchased the domain from).
3. Find your DNS manager (i.e. your domain settings manager). This could look something like "Manage my DNS settings" or "Edit DNS records."
Note: Refer to Part 2 for assistance finding DNS records for specific providers. If you don't see your provider in Part 2, then please contact your domain provider for assistance on how to edit your DNS settings.
4. Add an A record (IPv4) and set the "Name" to your domain name, excluding any prefixes like www/https (ex. gosite.com). Paste your GoSite IP address from Step 1 into the "Value" section. Leave everything else the same and click "Save."
5. Add a CNAME record and set the "Name" to www. Set "Value" to your domain name, excluding any prefixes like www/https.
6. Depending on the provider, these new DNS records could take up to 24 hours to propagate. To be on the safe side, you should wait 24 hours before completing Step 7.
Note: If you need your site up urgently, you can visit this site and type in your domain name (excluding any prefixes) at the top and click on "Go!" Scroll all the way to the bottom of the page and if you see your correct "A record" and "CNAME record" from the previous steps, then you can move onto Step 7.
7. Navigate back to your GoSite Dashboard and open up your Site Settings once again (refer to step 1 to learn how). Paste your domain name under "Custom Domain Name" (excluding any prefixes). Lastly, click "Update."
8. After clicking on "Update", your site will be published on your domain within 15-20 minutes. Once that time has passed, feel free to check out your new website on your domain!
The following tutorials go through Steps 3-6 of Part 1 on common domain providers. Please complete these steps and then refer back to Part 1 to finish publishing your website.
1. After logging in to your GoDaddy account, scroll down on your My Products page until you see your domain. Click on "DNS."-png.png?width=2360&height=568&name=Untitled%20(9)-png.png)
2. Find the A record that has the "Name" value as "@." Click on the pencil icon to the right of it. (If you can't find this A record, then just scroll down and click on "Add" to add a new record).
-png.png?width=1952&height=416&name=Untitled%20(10)-png.png)
3. Change the "Points to" value to your IP Address that you got from Part 1, Step 1. Leave everything else the same and click "Save." If you had to click on "Add" in the previous step, set "Type" to "A", "Host" to the "@" symbol, and "Points to" also to the IP Address you copied from before.
-png-1.png?width=1862&height=668&name=Untitled%20(11)-png-1.png)
4. Find the CNAME records that has the "Name" value set to "www." Click on the pencil icon and make sure that the "Points to" field has the symbol "@" in it, like the below screenshot. If not, then change it to that and click "Save."
-png-1.png?width=1922&height=516&name=Untitled%20(12)-png-1.png)
5. If you couldn't find this CNAME record, then add a new record again by clicking on "Add" at the bottom, setting "Type" to "CNAME", setting "Host" to "www", and setting "Points to" to the symbol "@". Then click "Save."
-png-1.png?width=1870&height=674&name=Untitled%20(13)-png-1.png)
Once you have both the A record and the CNAME record, you are good to go. Please refer back to Part 1 to finish publishing your site live.
1. After you've logged into your Wix account, click on your account name on the top-right hand corner and open the drop-down. Click on "Domains."
-png.png?width=252&height=524&name=Untitled%20(14)-png.png)
2. Click on the three dots next to your domain name and open "Manage DNS Records."
-png.png?width=2022&height=1108&name=Untitled%20(15)-png.png)
3. Under the section "A (Host)", click on "Add Record". If you see an existing A record with the "Host" set to your domain name, you can just Edit that record instead of adding a new one.
4. Leave the "Host" blank and point the "Value" to your GoSite IP Address from Part 1, Step 1. Then click on "Save."
-png.png?width=1936&height=510&name=Untitled%20(16)-png.png)
5. Under the section "CNAME (Aliases)", click on "Add Record". If you see an existing CNAME record with the "Host" set to www, you can just Edit that record instead of adding a new one.
6. Make sure "Host name" is set to "www", and "Value" is set to your domain name excluding any prefixes. Then click on "Save."
-png.png?width=1948&height=506&name=Untitled%20(17)-png.png)
That's how you add your A and CNAME records to Wix! Please refer back to Part 1 to finish publishing your site.
Still need help?
Visit us at gosite.com to chat, or email us at help@gosite.com.